Search This Blog

Showing posts with label Valentine's Day. Show all posts

Thursday, February 10, 2011

Raspberry Chocolate Macarons with heart sprinkle - a perfect treat for Valentine's Day


Macaron makes a perfect treat for Valentine’s Day. It is pretty. It is colourful. It looks special. You can improvise the looks and flavour to match the special occasion.

Umm…Valentine’s…I’m thinking about raspberry, chocolate, red/pink and hearts, and I’m thinking to put these elements into one, raspberry chocolate macaron with hearts.

I came across the idea of decorating macarons with sugar-heart from Secrets of Macarons book by Jose Marechal.


This book is a great macarons cookbook. It is full of techniques and tips on making macarons. Though it doesn’t have many recipes, it contains enough fundamental recipes for you to work on. For me, making macarons is not about recipe, it is more about tips and techniques and this book is full of those. If I had come across this book before, I wouldn’t have had to spend so much time scouting information on the internet and cooking forums, reading pages and pages on people’s experience and their trial-and-errors. The book is currently out of print (as checked on Amazon) but I found some copies at CostCo.

I bought a small jar of sugar-heart from a cake decorating section at Coles supermarket. Most likely, they are used for cup cake decoration. I never thought about putting these onto macaron shells until I saw it in the book.


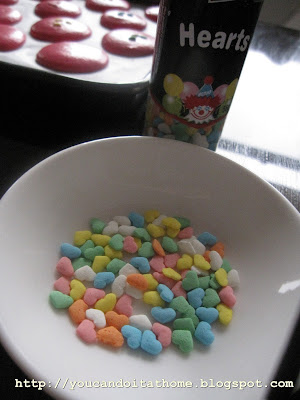
Sugar-hearts are sprinkled on the macaron shells before they are baked. Be gently when placing the hearts on the shells as you wouldn’t want to damage the shell and prevent its from rising and getting the feet.

I also tried making chocolate ganache without thickened cream. The ganache is mixture of raspberry coulis, white chocolate and dark chocolate, which I adapted from the strawberry ganache recipe from Secrets of Macarons cookbook. The ganache is less rich and creamy. Dark chocolate overpowers the white chocolate almost completely. However, white chocolate does provide a creamier texture. Without it, the ganache could be way too rich and bitter and the raspberry flavour could completely be overpowered.

I made raspberry filling for macaron before as a raspberry buttercream. Comparing the two filling types, raspberry buttercream and ganache, they are quite different. The raspberry flavour shines through more in buttercream. Its tart flavour blends really well with rich buttercream. Whereas, chocolate seems to dominate the flavour in raspberry ganache. The raspberry flavour is more subtle. So, it all comes down to your preference. If you are a chocolate person, the raspberry chocolate ganache will satisfy your taste buds more. However, if you like raspberry flavour to be more presented, the raspberry buttercream filling is for you. You can get the raspberry buttercream recipe from my previous post, just scroll down to the bottom of the post.


Raspberry Chocolate Macarons with little hearts Recipe

makes 25 3-cm macarons

Note:
More details on Basic Mararons using Italian Meringue tecniques can be found here.

You can also see more detailed intructions on making macarons in my Basic Macaron Recipe and I heart Macarons blogs (however, they are recipes using French meringue method). This recipe is using Italian meringue method. The only difference is the cooking sugar syrup part but the rest of the processes are the same.
 
Macarons shell ingredients
125 g pure icing sugar
125 g almond meal (almond flour or ground almond)
100 g egg whites (separated 24 -48 hours in advance and is at room temperature)
115 g caster sugar (super fine sugar)
30 ml water (2 tablespoons)
A pinch of red colouring powder or liquid
1 tablespoons of sugar-hearts

Raspberry Chocolate filling ingredients
100 g fresh or frozen raspberry, made to coulis
25 g (2 tablespoons) castor sugar (fine sugar)
90 g white chocolate, chopped
40 g dark chocolate, chopped
25 g butter, chopped

Making macarons shells

Sift almond meal and icing sugar together through fine sieve and set aside.

Divide egg whites into two equal portions (50 g each portion).  Pour the first portion of egg white (50 g) into the almond meal/icing sugar mixture, and put colouring powder or liquid in, but don’t mix or stir them.

Put the water and caster sugar in a heavy-base saucepan over medium-high heat. When the syrup start to boil. Place the rest of egg white (50 g) into a mixing bowl, using the whip attachment, whip egg white to the soft peak. When the syrup reaches 118°C (on a thermometer), take if off the heat and let it cool down to 115°C.

While the mixer is still running, slowly pour the sugar syrup down the side of the bowl. Be careful not to pour syrup onto the whip as it might spatter. Continue mixing until the meringue cool down to slightly above body temperature (50°C) or when the side of the mixing bowl is warm to touch. The whipped egg white would be stiff and glossy.

Mix a third of whipped egg white into the almond meal mixture and combine them well. At this step, I work the mixture very vigorously to blend the egg white with almond meal mixture. Fold the rest of whipped egg white into the mixture and mix well, yet gently, until the batter is smooth. The batter will be thick. It resembles a very thick cake batter, or as many web sites describe it as a magma-like consistency.

Put the mixture into a piping bag fitted with 1-cm plain tip (size #11). Pipe the staggering rows of 1-inch rounds onto baking papers or baking sheets.

Place sugar-hearts on half of piped shells. Be gentle and careful not to damage macaron shells/skin when placing the hearts. Damage shells could result in no-feet or flat macarons.

Let's put some loves onto the shells

Let the piped macarons shells stand at room temperature for 30 – 60 minutes to let the crust forms. This depends on the room temperature and humidity. When the piped shells are dry to touch without it sticking to your fingers. They are good to go into the oven.

Preheat the oven to 160°C (fan-force or convection oven, increase the temperature by 20°C if you’re using conventional oven) for at least 15 minutes. Just before baking, turn the temperature down to 150°C and bake the macarons for 15 minutes.

Lift the baking papers/sheets off the baking tray to the cooling rack and let it cool down before removing macarons.

Sandwich cool macarons shell with chilled ganache.


Store macarons in airtight container in the fridge. Macaron will taste better after it is chilled overnight.

Making raspberry chocolate filling

Making raspberry coulis, using spoon crushed raspberry until it becomes liquid. Stain through a find sieve to remove seeds. (you can also leaves the seeds in there, but the coulis will be tart and not smooth).

Heat raspberry coulis in a small saucepan, add sugar and stir until it dissolves. Bring it to a boil. Remove the pan from heat and pour coulis into the bowl filled with white and dark chocolate. Stir until the chocolate is melted.
Scatter the butter pieces onto the mixture and stir until it is melted and well combined.  


The filling needs to be chilled at least an hour before use. 

Macarons with lots of hearts! A perfect gift!

Tuesday, February 8, 2011

Blueberry Mousse Joconde Entremet with a little heart


I totally love my first Daring Baker Challenge last month, where I made strawberry chocolate mousse joconde entrement dessert. It was so enjoyable that I did it again but this time with the blueberry mousse filling.

This time, I made them into smaller cakes for individual serve. The recipes for joconde (almond sponge cake) and decorating paste are the same and you can found them here as well as the how-to-assemble-the-cake.

I changed the colour of the décor paste to purple (mix the red and blue colours together) to match the blueberry filling. I filled the dessert with blueberry mousse using Michel Roux’s recipe from Pastry: Savory and Sweet. The mousse tasted heavenly. It is so light and refreshing. It is an elegant dessert that is perfect for special occasion, like Valentine's Day:)


I also use heart-shaped cookie cutter to cut small heart pieces to decorate the dessert. It is to add some Valentine’s spirit into the cake:)

Blueberry Mousse Joconde Entremet recipe
Adapted from Michel Roux’s Pastry: Savory and Sweet

Make 4 small cakes

For recipe of joconde cake, décor paste and how to assemble the dessert, you can visit my Strawberry Dark Chocolate Mousse Joconde Entremet post.

Blueberry Mousse Recipe
60g caster sugar
300g fresh or frozen blueberry puree (made in a food processor and strain it through fine sieve)
8g leaf gelatin
2tbsp (30ml) creme de myrtilles liqueur (optional)
120g italian meringue (recipe is below)
150ml (2/3 cup) heavy cream, softly whipped
20-30 fresh blueberries, for garnish

Soak the gelatin in cold water to cover. Heat 50g of blueberry puree in a pan. As it begins to bubble, take the pan off the heat, squeeze the gelatin to remove the excess water, then stir it into the hot puree until dissolved. Stir in the remaining 250g blueberrie puree with a whisk. Add the liqueur if using, then delicately fold in the meringue with the whisk. Finally fold in the whipped cream using a flexible spatula.

Italian meringue
make 120 g
70g caster sugar
6g liquid glucose (optional)
1 large egg whites

Put 16 ml (one heap tablespoon) water into a heavy base saucepan, then add the sugar, and glucose if using. Bring to a boil over medium heat, stirring and skimming occasionally. Use a pastry brush moistened with water to brush down any crystals that form on the inside of the pan. Increase the heat and put a sugar thermometer into the boiling syrup. When it registers 110
°c, lower the heat to minimum.

Keeping an eye on the syrup beat the egg whites to stiff peak, either by hand or in an electric mixer. The moment the syrup reaches 121
°
c, take the pan off the heat and let the bubbling subside for 30 seconds. Pour the syrup in a thin, steady stream onto the beaten egg whites, whisking at low speed.

When all the syrup has been absorbed, continued to beat at low speed for 15 minutes until the meringue is almost cold (30-35
°c). It is now ready to use.

Monday, February 7, 2011

Sourdough Corn Bread with old bread crumbs – something old is new again!


This bread was inspired by a post at Wild Yeast Blog (and also my inner frugality and curiosity) about incorporating old bread that was turned into bread crumbs into the dough. The idea is also based on the bread-making wisdom that old bread will improve bread flavour and its keeping quality.

I love the idea that instead of throwing stale bread away, I can make the use out of it. The piece that was destined for the bin or compost could potentially improve the bread flavour and texture. It is a fabulous idea.

I had a small piece of sourdough corn bread left over from two weeks ago that I have put them aside in the fridge. I chopped it into one-inch pieces and process them in food processor to get the breadcrumb (it was about 90 grams, or 10% of total flour weight).

Fully loaded with corns, cornmeal, polenta and old corn bread.


The bread is fully loaded with corn. It has 20% polenta flour (cornmeal), 19% coarse polenta and 10% cornbread breadcrumbs in it (all percentage are measure against total  flour in the recipe. It’s called “Baker’s Percentage”). I also added some honey and butter to enhance the bread flavour and texture.

The bread tastes absolutely wonderful. It is a really yummy bread. It is simple on its own and even better with butter. It has an outstanding aroma  and mild sweetness from corn and honey. The aroma is even stronger when toasted. The texture is also different from my normal sourdough. It is dense, yet soft, moist and chewy. I suppose that butter contributes to the softer texture. However, I was surprised that 5% of butter can do so much. It made me wonder if polenta/cornmeal has something to do with the softer crumb.


Comparing the same loaves baked at different occasions, with old breadcrumbs, and without, I think that the one with old breadcrumb taste better. For the better keeping quality part, I will never know, as we finished two loaves in four days.


I also made the heart stencil onto the bread to get into the theme of Valentine’s Day. I got a cake stencil pack from Daiso shop ($2.80 shop from Japan).  It has about 5 different stencil designs in the pack, including hearts. I have also included how to do the stencilling after the bread recipe. Amazon also has a great selection of bread stencilling tool


Recipe note:

1. You might have to adjust the water in the recipe due to the added breadcrumbs. I had to add about two tablespoons of water to adjust the dough consistency.  

2. Because cornmeal doesn't contain gluten, the dough won't have a good gluten development. I stopped kneading when I almost achieved medium gluten development,which take about 30 minutes kneading by hand. It was when I can partially stretch the dough without tearing it.

3. I left the dough to autolyze for 30 minutes.

4. The dough was retarded overnight in the fridge.

5. I did two stretch-and-folds, during two-hour bulk fermentation, i.e. first fold at 40 minutes and second fold at 80 minutes.


Sourdough Corn Bread with Old Bread Recipe
Make 2 large loaves


Overall formula
Baker Percentage
Bread Flour
727 g
80%
Cornmeal (also called polenta flour, maize flour)
180 g
20%
Water
662 g
73%
Coarse polenta

Old bread, crumbed
170 g

90 g
19%

10%
Butter
45 g
5%
Honey
45 g
5%
Salt
18 g
2%
Grand total
1.847 kg
204%


Liquid Levain build
Bread flour 136 g
Water 188 g
Mature culture (liquid)  28 g
 
Soaker
Polenta (coarse polenta) 170 g
Water 227 g

Final Dough
Bread flour 591 g
Cornmeal (also known as polenta flour and maize flour)  226 g

Old bread, crumbed 90 g
Water 662 g
Butter 45 g
Honey 45 g
Salt 18 g (1 tablespoon)
Soaker all of the above
Levain all less 2 tablespoons


METHOD

1.    Liquid-levain build: Make the final build 12 - 16 hours before the final mix.  Keep it in the covered container and stand at the room temperature.

2.   Soaker: Make the soaker at the same time when making levain build. Pour the water (or cold water) over polenta and mix thoroughly. Put it in a covered container and sit at room temperature.

3.  Mixing: Add all the ingredients to the mixing bowl except the salt. Mix or stir the ingredients together until it becomes a shaggy mass. Cover the bowl with cling wrap or plastic bag and let it stand for an autolyse phase for 20 -60 minutes. At the end of the autolyse, sprinkle the salt over the surface of the dough and mix on a medium speed for 3 -5 minutes until the medium gluten development is achieved. I mixed by hand and it took about 30 minutes..

4.  Bulk fermentation: 2 hours. Cover the bowl with plastic bag or wrap and sit at room temperature for 2  hour. Do two stretch-and-folds at 40 mins, and 80 mins.  

5.  Folding: Two stretch-and-folds at 40 minutes interval (i.e. at 40 minutes, and 1 hour 20 minute).

6.  Dividing and shaping: Divide the dough into two equal pieces, pre-shape the dough into round. Cover the dough with tea towel and let it rest for 15 minutes. Final-shape the dough into either oblong (batard) or round (boule).

7.  Final fermentation (proofing): Approximately 1 ½  hour or retard the loaves in the fridge overnight.

8.  Baking: with normal steam, 235C for 40 45 mins, turn the loaves half way through the bake. (I retarded the dough and took it out in the morning. I then let it rest at room temperature for about an hour. In the meantime, I preheat the oven for about an hour to heat up the baking stone).


Stencilling the bread:

Remove the proofed dough from proofing basket and mist the dough surface lightly with water.

 You can also find bread stencilling tool from Amazon


Put the stencil pattern on top of the dough, using a small sifter to sift flour onto the pattern.

Remove the pattern and bake the bread as normal.


A loaf made from heart
 
Submitting this post to YeastSpotting.

Sunday, February 6, 2011

Heart Macarons filled with Strawberry Buttercream for your Valentine(’s Day)


It’s February, Valentine’s Day is approching and love is in the air.

Not that I celebrate Valentine’s Day in a commercial way. I just like cooking/baking with theme. It is nice to keep my creative spirit going and add little affection into my baking. So, I’ll keep the blog filled with Valentine-related posts for the whole week.

One of the symbol of Valentine’s day is red heart or anything heart really. When it comes to food, sweets chocolate and strawberry also have strong association with Valentine’s Day. With this in mind, macarons with rich strawberry filling seems like a perfect treat for your significant other, your valentine.

I also wanted to try making macarons into shapes other than the usual round ones. First idea that came to my mind was heart-shaped macarons. This was my first time making macarons into other shape and I wasn’t sure how it would turn out. Would I still get the macarons’ feet? Would the piped shell hold its heart-shape after it’s piped and baked? So many questions and doubts!


I used the heart cookie cutter to trace hearts into parchment papers. I then piped the macarons batch into the heart drawing. I started by tracing the frame of the heart first, then gradually fill the whole heart. I used the smaller pipping tip, the 3-mm size (or size # 3) to facilitate the heart drawing. It would be difficult, if not possible, to work with the usual round 1-cm tip with this project.

The result? It is possible to make macarons into other shapes, though a good piping skill can help tremendously. The heart-macarons came out nicely with feet and all. I was happy at some level but the shell was a little bumpy as I wasn’t careful enough when I piped. I thought that the batter will eventually comes together after the tray was tapped onto the bench (this is to flatten the macarons and remove any airs/bubbles) which usually apply to the round macarons.

*Note: if you don't think you're up for piping heart-shape macarons, you can sprinkle heart-sugar onto the shells to add the valentine spirit to the macarons. I also made Valentine's Macaron version using this method, which can be found on this post. **

I also chose to make these macarons using Italian meringue technique, where egg whites are whipped together with cooked sugar syrup. This method is more forgiving when it comes to mixing/incorporating the almond flour and icing sugar into egg white. It is less likely to overmix the batter and provide more consistent result regardless of weather condition (humidity is not a good friend to macarons).

I usually make macarons using French meringue method (egg whites are whipped together with super fine sugar) as I prefer its simple processes and the texture it produces. However, the weather was rather humid in Melbourne at the time I made this and I needed to make sure that the macarons batter will be super smooth for this non-particular shape.

This was the second time I used Italian meringue method. First time, I failed miserably. The macarons shells were tough, crunchy and hard. I blamed it on the Italian Meringue techniques, not knowing that I misread the sugar thermometer! Yeap, it was one of those cooking incidents, where I read the degree on thermometer in farenheit instead of celcius. And yes, the sugar cooked at 115°F (which is 46°C) wasn’t going to be any good for Italian meringue. That was why I failed so miserably and I had to bin all the macaron shells.   

It was alright with Italian Meringue method this time but I’m still not totally convinced about the texture it produced. Maybe I didn’t do everything correctly. Maybe I didn’t follow the recipes to the T. But I will give it another go with my next week’s bake. If it works, I shall write up a post about macarons using Italian meringue method.

The recipe is from Pierre Herme’s Macarons cookbook posted on He-Eats blog which was translated from French. The macarons were filled with strawberry buttercream using my home-made strawberry jam.


Here is the recipe….

Heart Macarons with Strawberry Buttercream Recipe

makes 24 heart macarons

Note:
Details and walk through for Basic Macaron recipe using Italian meringue method can be found here.

You can also see more detailed intructions on making macarons in my Basic Macaron Recipe and I heart Macarons blogs (however, they are recipes using French meringue method).
 

Macarons shell ingredients
135 g pure icing sugar
135 g almond meal (almond flour or ground almond)
100 g egg whites (separated 24 -48 hours in advance and is at room temperature)
135 g caster sugar (super fine sugar)
34 ml water (2 tablespoons + 1 teaspoon)
A pinch of red colouring powder or liquid

Strawberry buttercream ingredients
3 large egg yolks, at room temperature
90 grams castor sugar (fine sugar)
90 grams butter (soft butter, but not melting)
15 ml water (1 tablespoon)
½ cup strawberry jam (I used a homemade jam in this recipe)

Making macarons shells
1.   Preparing heart pattern/drawings on parchment papers. You will need two for this recipe. Turn the papers upside down so that the drawing will be on the other side (otherwise, you'll have a nasty black colour stuck to your shells). Use the papers to line the baking tray. 


2.   Sift almond meal and icing sugar together through fine sieve and set aside.

3.   Divide  egg whites into two portions, 50 g each portion.  Mix the first portion of egg white (50 g) into the almond meal/icing sugar mixture, and mix colouring powder or liquid in, but don’t mix or stir them.

4.   Put the water and caster sugar in a heavy-base saucepan over medium-high heat. When the syrup start to boil. Place the rest of egg white (50 g) into a mixing bowl, using the whip attachment, whip egg white to the soft peak. When the syrup reaches 118°C, take if off the heat and let it cool down to 115°C.


5.   While the mixer is still running, slowly pour the sugar syrup down the side of the bowl. Be careful not to pour syrup onto the whip as it might spatter. Continue mixing until the meringue cool down to slightly above body temperature (50°C) or when the side of the mixing bowl is warm to touch. The whipped egg white would be stiff and glossy.

6.   Mix a third of whipped egg white into the almond meal/icing sugar/egg white mixture and combine them well. At this step, I work the mixture very vigorously to blend the egg white with almond meal mixture. Fold the rest of whipped egg white into the mixture and mix well, yet gently, until the batter is smooth. The batter is thick and  it resembles  a very thick cake batter, or as many web sites describe it as a magma-like consistency.

7.   Put the mixture into a piping bag fitted with 3-mm plain tip. Pipe the batter onto baking paper traced with hearts. I started by tracing the heart frame first and then fill the whole heart up. It felt a bit struggling at first, but after few hearts, I got the hang of it and it became relatively easy.

8.   Let the piped macarons hearts stand at room temperature for 30 – 60 minutes to let the crust forms. This depend on the room temperature and humidity. When the piped shells are dry to touch without it sticking to your fingers. They are good to go into the oven.

9.   Preheat the oven to 160°C (fan-force or convection oven, increase the temperature by 20°C if you’re using conventional oven) for at least 15 minutes. Just before baking, turn the temperature down to 150°C and bake the macarons for 15 minutes.


10. Lift the baking paper off the tray to the cooling rack and let it cool down before removing macarons.


Making Strawberry Buttercream

1.   Mix the sugar with the water in a small heavy-base saucepan. Place it over medium-high heat and bring it to a boil. Using a candy thermometer to measure the sugar temperature, continue to boil until it reaches 121°C . If the sugar begins to crystallize on the sides of the pan, wash them down with a pastry brush dipped in the water.

2.   Meanwhile, using whip attachment, whip egg yolks in electric mixer on medium high speed. They will begin to turn pale and yellow and will become light and thick.

3.   Change from whip attachment to flat beater before pouring the sugar syrup into the egg mixture.

4.   When the sugar reach 121°C, remove it from heat. With the mixer on medium-high, slowly pour the syrup into the egg yolks in a thin stream between the whip and the sides of the bowl. Be careful not to splash the hot syrup, or your buttercream may from small sugar crystals in it. Continue beating until the yolks are thick and fully cooled (when you touch the side of the bowl and it’s cool to touch).


5.   Reduce mixer speed to medium and gradually add small amount of butter (soft but not melted), but only as much as it can be absorbed into the mixture before adding the next amount. Continue to beat well until the buttercream is smooth.  It will take about 15 minutes.

6.   Add strawberry jam, and beat for an additional minute.
7.   Chill the buttercream for at least an hour before using.

Sending this post to Weekend Herb Blogging which is hosted by Janet from TasteSpace blog this week.